Search this Blog
Sadie's Blogs and Website

For posts 2006-2010
please visit
sadievaleri.blogspot.com

Sadie’s current site is at
SadieValeriAtelier.com

UPDATE February 1, 2021

I have recently discovered that unfortunately this Squarespace blog has failed to maintain most the images for older posts on this blog. Luckily, the original Blogger version is still live at sadievaleri.blogspot.com and all the posts and images from 2006-2010 are still visible there.

For my current artwork, teaching, and blog please visit Sadie Valeri Atelier.


Saturday
Mar202010

Ecorche - Skull Refined


As Andy says: "Really nerd out on all the little details"! It was fun to spend the day doing all the tiny refinements that make the structure of the bones feel both delicate and strong. I was thinking, just like with painting, it's so important to notice the difference in edges - sharp versus rounded, and everything in between.

Saturday
Mar202010

Home-Cooked Gesso Part II

My materials for making home-made gesso.
Clockwise from left:
2 nested pots on a portable electric burner, metal mixing bowl and wooden spoon, Sinopia brand Titanium White pigment (so glad I bought two jars!), small power sander, bag of marble dust. Not shown: ArtBoard brand panels, housepainting brush, large tupperware

I bought everything at a hardware store and art supply store; the pots and bowls I stole from my own kitchen - not to be used for food again.

I previously wrote a post about making my own gesso. This new post shares my notes based on my most recent batch: This week I prepped over 30 very small panels for my students.

The instructions below are based on the recipe and steps outlined on the Sinopia website, but I added all the tips and tricks I discovered along the way (my notes are in italics):

Preparing Glue Size (Rabbit Skin Glue) DAY ONE AND TWO

  • Soak one measure (by volume) of glue to 12 measures of cold water
  • I used 1/4 cup RSG to 3 cups water in a big tupperware container I do not plan to use for food again
  • Allow glue to soak preferably overnight
  • The next day it is a gelatenous substance.
  • Heat glue mixture in a double boiler bath - I don't have a double boiler, so I just nested two pots together which worked fine: I boiled a half-pot of water on a portable electric burner in my studio, and nested a smaller pot inside. The smaller pot is non-stick. The glue melts and becomes liquid very easily.
  • Apply glue while warm with a flat brush - I used a housepainting brush, but a softer art brush is probably better.
  • Be warned: this is makes sticky mess, since you need to cover the panel on all sides and there is nowhere to hold onto it. I discovered this method works best:
  • Hold the panel from underneath on your fingertips, like a waiter holding a tray, and then brush the glue onto the (top) painting surface and edges.
  • Lean the panel against a wall, so just the top edge or corner is touching, and them gently brush glue on the back side. (I scored and folded foamcore to protect my wall and floor)
  • Usually two layers are enough to seal the wood effectively. It dries fast, in about an hour or less I could do the second coat. Then I let the panels dry overnight.
  • At this point it is advisable to adhere a piece of fabric (thin muslin sheeting) to the panel to help stabilize the ground and to protect it from joints in the panel that might show in the gesso. (I did not do this - I like my painting surface to be very smooth and I didn't want the cloth texture.)
  • The left over glue-size then gets used for the chalk ground.
  • NOTE: The RSG turns to jelly again if you let it cool, it firms up quite a bit of you leave it to cool overnight, but you can re-heat the next day, it works fine.

Chalk Grounds: Ingredients DAY THREE, FOUR, FIVE....

3 parts of glue size (by volume) (I made extra RSG and used 3 cups)
1 part chalk (I used 1 cup)
1 part pigment (white, english red, umber, etc.)
I found it needs more pigment, otherwise the gesso is too watery and transparent. I ended up using more than 1.5 parts.
I used Titanium because I did not want to deal with the health hazards of sanding the lead-based "Flake" white


Chalk Grounds: Directions
  • Measure out the glue size solution into a metal container (I did not understand this at first - but it is to help measure correctly, since it is hard to know how much is left over in the double boiler once you have used it to coat the panels. I used a large metal mixing bowl.)
  • Add the dry ingredients
  • Stir well but do not whisk to prevent air-bubbles (I used a wooden spoon, worked great)
  • Place container in a double-boiler bath (see my nested pot solution above)
  • Apply warm mixture with a broad brush (I found it's better if the gesso is only slightly warms - when the water in the bottom pot is not full boiling, just simmering. The gesso is a bit thicker and covers more when it is only slightly warm, not hot.)
  • Allow layer to dry to the touch and recoat. (I found it did not dry fast enough to re-coat within a few hours. I ended up letting it dry overnight between each layer. I also sanded between before each subsequent coat with a small handheld power sander I bought for less than $40 - so worth it!!)
  • Note: When applying layers of ground, brushstrokes should be applied in one direction for every coat. Reapply subsequent layers in a perpendicular direction to the previous application. Yes this is true - otherwise deep grooves can develop which are hard to sand away.
  • I ended up doing 3 coats of gesso on most panels, and 4 on a few of them. It ended up being a week-long project, spending about an hour per day.
  • The gesso cools in the pot and gets quite firm overnight. I just left it in the double-boiler and re-heated the next day, it turned back into brushable paint very quickly and the texture was fine. Sometimes I added more pigment or RSG as it warmed, depending on whether it seemed too thick or too watery.
A note about my sander: I used a handheld Black and Decker sander, bought for less than $40. It had a micro-filter feature for reducing dust which worked quite well. I'm not a power-tool kind of person, but it was amazingly easy to use. Highly recommend!

Hope you find this useful! I know I'll be referring to these notes when I prep my next batch of panels, hopefully not for a good long time :)

Wednesday
Mar172010

Ecorche: Ribs

After refining the basic "flattened egg" shape of the ribcage, I was finally able to etch the ribs and carve them out a bit. The hardest part was getting the distribution and spacing correct: 10 attached ribs, 2 floating ribs, each spaced equally apart! A hint: The 8th rib at the back lines up with the 5th rib at the front.


The skull has been refined a bit - I look forward to "nerding out" on the details!

More info about my ecorche/anatomy class with Andrew Ameral:

Saturday
Mar132010

Ecorche: Spine and 2 more Skulls

Skull Proportion Studies
8 1/2 x 11 inches, graphite on mylar

I drew these skulls from life but first I constructed them based on rules of proportion. Now I have a bunch of questions for my anatomy teacher Andy (www.andrewameralart.com), because they still don't look quite right. I think in the upper left study I somehow inadvertently moved the top of the zygomatic arch up too high. And the lower one has some unidentifiable problems!

It's strange working with skulls... playing with proportions, both the drawings and the clay model of the skull just look warped and non-human, but as I adjust them they suddenly they start to approach a look I call "skullish", meaning suddenly they start to look like skulls.


I think we all have a template for what a skull looks like. I have noticed that at a certain point, the skull "locks in" (or at least gets closer) to the idea of a skull.

Spine Studies
8 1/2 x 11 inches, graphite on mylar

These spine studies are after Richer. His anatomy diagrams at first looked cold and a bit boring to me, but the more I copy them, the more I am impressed by the enormous amount of very precise information he packs in: gracefully at that, and with highly economical linework.

I spent a couple hours just blocking in these spines, but I got overwhelmed to think of drawing every little spinous process. I think I'll just draw ONE vertebrae from several angles!

Thursday
Mar112010

Ecorche Drawings: Pelvis, Shoulder Girdle, Skull/Rib/Pel combo

Two views of the Pelvis
graphite on mylar, 8 1/2 x 11 inches

More studies for my Ecorche Anatomy class with Andrew Ameral. Two solid studio days of just drawing bones, what fun!

Side view of the Pelvis
graphite on mylar, 8 1/2 x 11 inches

I'm also continuing to refine my clay figure, but it's coming along very slowly! I have massed in my ribcage, pelvis and spine, but I won't bother to post photos till they are more developed. Will hopefully post some photos of a prettier skull this weekend.

Shoulder girdle studies
graphite on mylar, 8 1/2 x 11 inches

Studies of Skull, Ribcage, Pelvis relationships
graphite on mylar, 8 1/2 x 11 inches

Most these drawings are copies from anatomy books (sometimes composites from several), only the pelvis drawings are from life.

Sunday
Mar072010

M Gallery Show Opening

I just got home from Florida, where I attended my show opening Friday night at M Gallery in Sarasota. This is me and Nowell outside the gallery on opening night.

These are my 6 paintings hung for the show, all together representing nine months of full-time painting. It was a treat for me to see them framed and hung as a group.

For more information about the collection visit my page on the M Gallery website.

The evening was truly enjoyable and the turnout was high for this sunny First Friday (after several unusually rainy months in Florida). The gallery estimated they had 500-600 visitors!

UPDATE: My fellow exhibitor Michael Lynn Adams has written up a nice post about our opening on his blog, click here to visit it.

I'll be back in Sarasota to teach my Still Life Painting workshop March 22-26. The workshop is filling up but there are still a few spaces available! For more information about the workshop please visit my Teaching Page.

Wednesday
Mar032010

Study of Ward

Study of Ward
16 x 20 inches, graphite pencil on paper

This is the demonstration drawing I did during my most recent "6 Sundays" figure drawing class with 6 private students at my studio. The "moon" in the upper right corner is the remnants of my lecture on how light and shadow behave on a sphere.

We all had a wonderful time studying the figure in a long, multi-week pose under cool north light.

I am offering my next Classical Long Pose Figure Drawing class at my studio in San Francisco beginning May 16th, 2010. Please visit my Classes and Workshops page for more information.

I am also planning to set up a long pose model share, full time for 2 weeks, probably in July. If you would be interested please email me to let me know: sadiej@gmail.com. This will be an uninstructed workshop, limited to a small group, with the option to draw or paint. More information coming soon!

Also, I leave tomorrow to fly to Florida for my opening at M Gallery in Sarasota, where I will be showing 6 paintings.

Friday
Feb262010

Ecorche - Pelvis Drawings

Posterior and Anterior views of the pelvis, graphite on mylar, 8.5x11 inches, done for Andrew Ameral's Ecorche class

I have to do 5 by tomorrow, I'm still working on the other 3.... this Friday night will be spend at the studio!

The real human pelvis I bought at the Bone Room is great to have, much easier to see the forms than when looking at the anatomy books. But it's a bit tilted/twisted (the poor old lady must have had a hard time walking at the end of her life!) so I draw from a combination of the books and the real specimen.

My studio setup at the moment:

Friday
Feb262010

Ecorche: Skull

Continuing on with Andrew Ameral's Ecorche class I'm taking through June.

Andy showed me where my proportions were off in my previous version, and after fixing it up, the skull is looking a bit more skull-ish. This version has not had Andy's critique yet, I'm sure there are still lots of things to fix.

Friday
Feb192010

Ecorche - Skull and ribcage drawings

Here are this week's anatomy drawings to prepare for my ecorche class on Saturday.

All of these are on 8.5 x 11 inch, graphite pencil on mylar. Oh, since I was asked in an email, this is the mylar I use. Be careful and read the label before you buy it at the store, though - it's really easy to buy the wrong stuff, the clear acetate pad looks almost exactly the same. (And it does not come in 8.5x11, Andy requested we do our assignments in this format so I cut down sheets from a larger pad).

Figuring out how to do the correct spacing on the ribs was the challenge. I did not realize how hard it was going to be. I can;t imagine sculpting this.... I guess I'm about to find out!

I really like the stage of drawing where I get to play around with tiny subforms and see all the crazy shapes nature can perform. But with the ribcage, it was all just blocking-in and measuring, no time to explore the fun details of the morphology.


I have a feeling there will be more ribcage drawings assigned next week though, so maybe I'll get my chance.

Sooo tired, but having a lot of fun!

Thursday
Feb182010

Ecorche - The skull is refined a bit

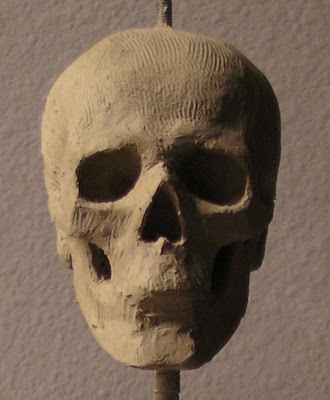
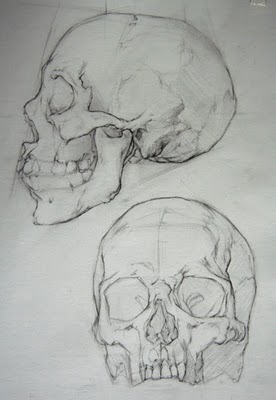
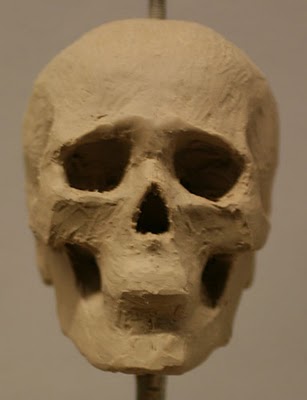
Today I worked on my ecorche skull for about 4 more hours and did not get close to finished.... I never knew I could spend so much time on 3 inches of clay! I think I over-emphasized the "worried" look.


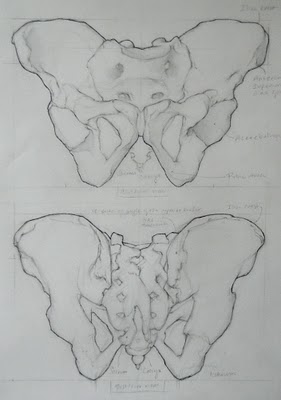
As difficult as it is getting all the proportions and forms correct... then it has to be symmetrical.

Andy has shown us key landmarks for keeping the whole thing in proportion, but while I whittle away at the details with tiny dental tools I back up and realize the main proportions have been distorted - then it's back to hacking away with the bigger tools.

Anyway, it was a lot of fun, and I started to get a feel for how the clay works and what the different tools do. I began to get a real appreciation for plastelene (non-hardening) clay. It's amazingly structural, takes deep carving easily but also holds up when you want to just take a tiny shaving off.

Neat-o stuff!

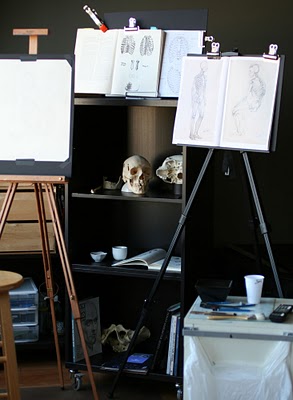
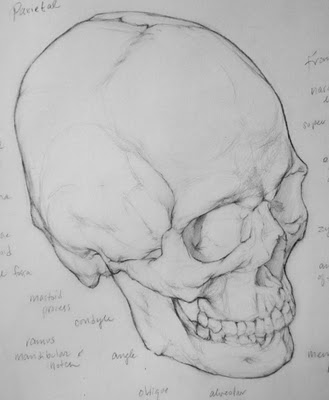
Above is my current setup in my studio for the anatomy drawing homework. I open every anatomy book I have and pick the best images and prop open the pages for easy reference while I am working.

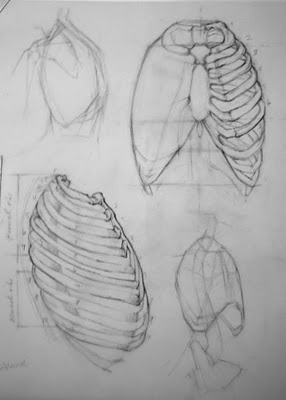
This week I'm drawing the ribcage. I didn't realize how difficult it would be, it's not the sheer number of ribs that's the hard part, it's getting the correct angles, width and spacing.

I have more appreciation every day for the efficiency and complexity of organic engineering: Twelve ribs and not one is parallel to another, yet together they form the most perfect, graceful cage.

If you bend your fingers slightly, with a bit of space between them, into a soft, almost-fist, you'll see at no point are any of them parallel... the ribs are the same way, every facet converging or splayed, but all together they look evenly spaced.

It's a feat of engineering!

Saturday
Feb132010

Ecorche - Skull

I started sculpting the tiny skull today in my ecorche class with Andrew Ameral, beginning with building a proportional shape showing the major planes, then roughing in the features.

Saturday
Feb132010

Écorché - Skull drawings

Last week was the first day of my ecorche class with Andrew Ameral.

Ecorche is studying anatomy by sculpting a "flayed" figure - as if it has no skin, so you can see the bones and muscles. We sculpt the bones first and then build all the muscles over the skeleton.


Every week we will have drawing homework. This week we were assigned to draw a skull from 5 different views. It took me exactly 10 hours to draw these 5 skulls - very, very difficult to get the proportions correct.

These two sheets of drawings are each are 8x10 inches, drawn with graphite on mylar paper. Mylar is a translucent vellum that is my new favorite paper for pencil drawing. It grabs the graphite with a silky/dusty feeling and is capable of getting a huge range of value from graphite. These drawings were all done with 2H (very hard) pencils.


I also need to label these with all the names of the bones of the skull - did you know the skull is made up of 22 different bones?

I bought my skulls at The Bone Room. The store is near me in Berkeley, CA, but you can also buy from them online. The cast skulls with the brand name "Bone Clone" are amazingly high quality for a very reasonable price!! I bought the two skulls (one real, one cast), a whole pelvis, and also a fibula (which nicely illustrates the tapered, spiraling nature of organic form!). I contemplated lots of other things to buy, but had to hold off for now. Next I am going to save up for a whole skeleton....

Andrew's class runs through June, and I'll be blogging it as much as possible, so stay tuned!

Friday
Feb122010

American Art Collector Feature

I'm thrilled to be included in the March 2010 issue of American Art Collector Magazine, to hit the stands in about 10 days (the PDF for subscribers is available now).

The article promotes my March show with Michael Lynn Adams at M Gallery in Florida. I will be showing several of my Wax Paper series, as well as the new Conch Shell and Pewter Pitcher paintings.

Wednesday
Feb102010

Conch Shell - FINISHED!

oil on panel, 9 x 12 inches
See previous post about this painting

(detail)

Over the last month blogging has taken a backseat to finishing the final paintings for my upcoming show at M Gallery in Florida, also setting up my new studio, starting private classes and workshops at the new studio, and teaching MFA candidates one day a week at the Academy of Fine Art.

Phew!

Oh, and I also started an amazing, inspiring ecorche class (sculpting all the bones and muscles of the human body in clay) with Andrew Ameral, master anatomy teacher from the Florence Academy.


So yes, I have been very busy, but really never happier!!

Wednesday
Feb102010

Pewter Pitcher

oil on panel, 8 x 8 inches

My favorite little pitcher, it was such a joy to do a study devoted to it alone! So many lovely oranges and lavenders peeking through its patina....

This painting and 5 others will be at my show at M Gallery in Sarasota, Florida for the month of March, opening March 5.

Be sure to check out the workshop I am offering in Sarasota to coincide with the show, and my other upcoming classes and workshops!


Tuesday
Jan122010

First drawing class in the new studio

I just held my first class in my new studio, a weekend figure drawing workshop. The class was a wonderful group, and we all had so much fun!

There is still space for ONE more student in my 5-week figure drawing class beginning this Sunday, an opportunity to study a long pose in my new north-light studio.

Also, I just posted registration information for my upcoming classes: "Still Life Painting" and "Drawing for Absolute Beginners".

More information at:
www.sadievaleri.com/teaching.html

Thursday
Dec242009

Conch Shell

I grew up visiting Cape Cod in Massachusetts, wandering the beaches with my back tanned dark from all my hours hunting seashells. So I was delighted when I saw this familiar shape sitting on the windowsill at the home of my friend Lisa. She told me a friend of hers found it intact on a Cape Cod beach, which I happen to know is a real find because they are usually broken. Lisa agreed to let me borrow it, and now that the new studio is set up I am finally able to begin studying the shell.

Drawing a seashell is like solving a puzzle - every piece fits logically with every other piece, there can be only one way it all fits together, and it is completely wrong until it is completely right. The same way some people enjoy doing crossword puzzles, I'm going to enjoy my next few hours at the easel finding how all those pieces fit together.

Wednesday
Dec232009

Studio Photos


The new studio is finally all set up! Thanks to everyone who made it to my studio warming party, if you missed it and you'd like a tour, just email me to arrange a visit.

I have been designing this studio in my mind for years, it's wonderful to get the chance to create the ideal environment for my work and for teaching students.

If you are interested in studying painting or drawing with me, please visit my Teaching Page to see the schedule for classes beginning in January. Also, sign up for my mailing list to be notified when new classes are posted.

Wednesday
Dec092009

Sterling Boat: FINAL

Sterling Boat
oil on panel, 9 x 12 inches

Finally finished! It ended up taking about 16 sessions over the course of a month, for a total of 68 hours, including the initial contour drawing. Thanks to everyone who has followed along the last few weeks as I posted all the stages of this painting, it been an interesting experiment to document the process so closely.

Here's a slideshow of all the stages of this painting:


Click slideshow to see it larger in Picasa

This painting will be in my March show at M Gallery in Sarasota, Florida. The show will coincide with my painting workshop, March 22-26, also hosted by M Gallery.

I've just added Still Life Painting classes to my San Francisco teaching schedule. I'm thinking about offering a drawing course for absolute beginners later in 2010, if this is something you'd be interested in please email me.

Finally, my new studio is coming together and I'm looking forward to posting photos soon, stay tuned!

Sign up for my mailing list to be notified when I post photos of the new studio, new artwork, and upcoming art classes.

Page 1 ... 5 6 7 8 9 ... 25 Next 20 Entries »