Search this Blog
Sadie's Blogs and Website

For posts 2006-2010
please visit
sadievaleri.blogspot.com

Sadie’s current site is at
SadieValeriAtelier.com

UPDATE February 1, 2021

I have recently discovered that unfortunately this Squarespace blog has failed to maintain most the images for older posts on this blog. Luckily, the original Blogger version is still live at sadievaleri.blogspot.com and all the posts and images from 2006-2010 are still visible there.

For my current artwork, teaching, and blog please visit Sadie Valeri Atelier.


Entries in drawing (125)

Tuesday
Apr192016

New Video: Block-In From Bargue Plates and From Life

Learn to Draw with Bargue Plates Part 1: Line Drawing and Proportion

Our latest videos teaching the classical drawing method of Straight Line Block-In are now available streaming in our Online Atelier.

Bargue Plates are 19th century lithographs of drawings by the painter Gerome created specifically to teach students how to draw. They are brilliantly executed and organized, and lead the student from drawing simple lines up through creating fully rendered figures, all based on casts of ancient Greek and Roman sculpture.

In the video I also demonstrate how to apply the same methods and principles to drawing 3-dimensional objects.

Join Sadie Valeri’s Online Atelier now for streaming access to all of Sadie’s videos:

Friday
Jun102011

Study of Torrey: Block-In

NEW CLASS: 

Due to high demand I am now offering an additional Figure Drawing Class this fall:

6 Saturdays 12pm-4pm 
September 17, 24
October 1, 8, 15, 22

Sign up for Figure Drawing Fall 2011 here


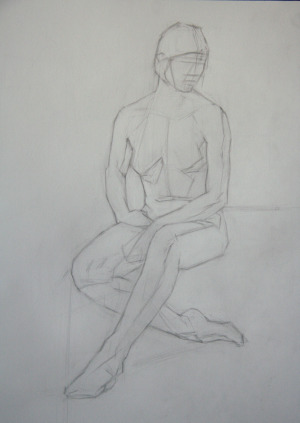
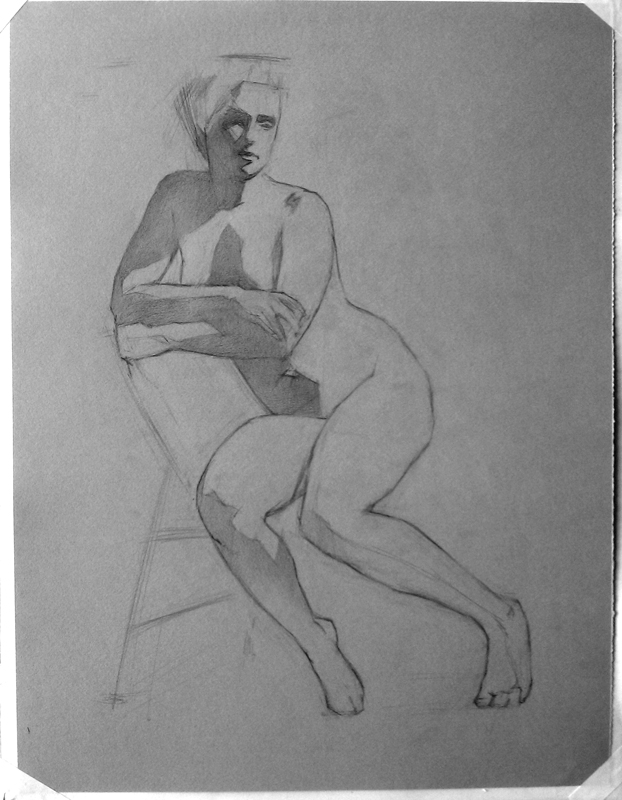
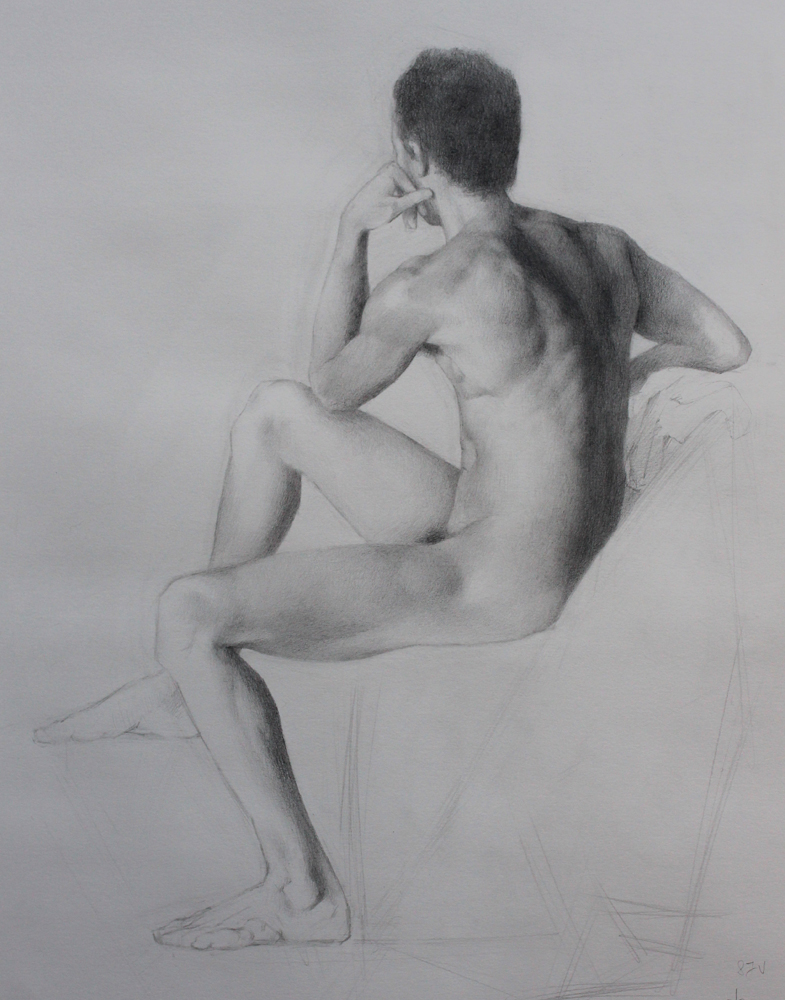
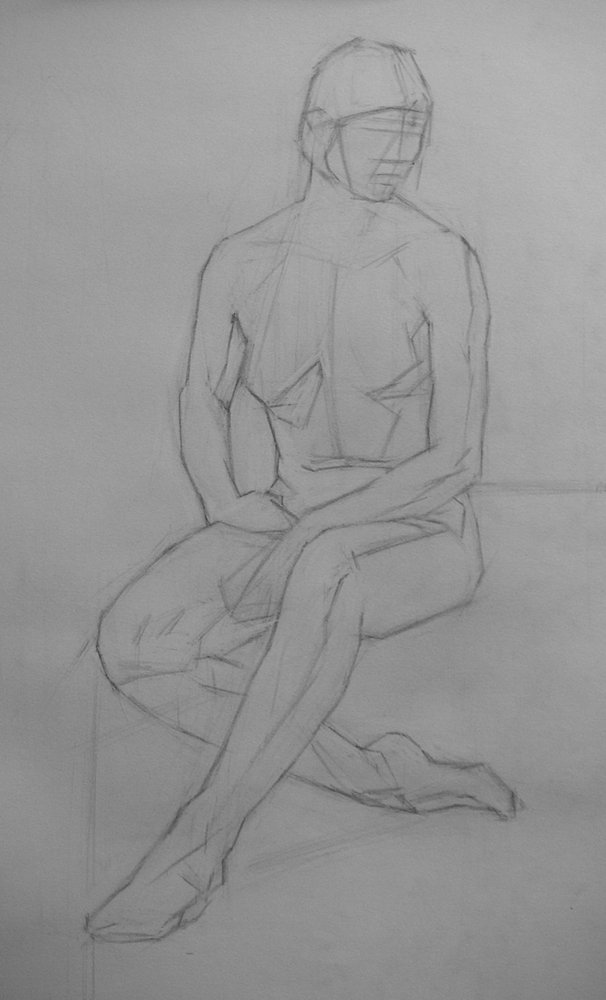
This is a “quick” three-hour study I did last night in our Thursday evening model session. This will only be a 2-session pose, so I wanted to get as far as possible so next week I can focus on modeling form.

I took photos of the whole process of blocking in the figure:

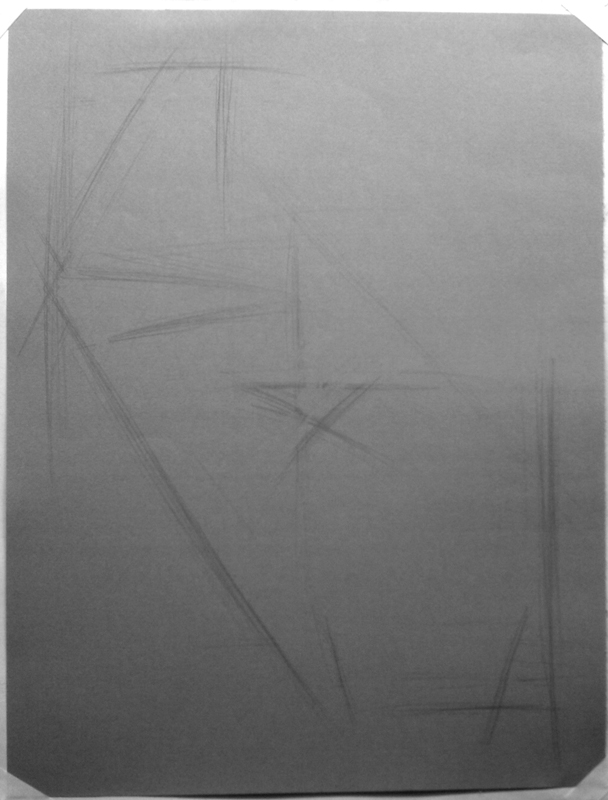
I started just marking the top and bottom, and left and right, to get the whole positioned well on the page.

Then I took a mid-point measurement vertically. Since this particular pose is almost as wide as it is tall, I also took a horizontal mid-point measurement. For both marks, I make a visual note of where on the model the exact halfway points hit. 

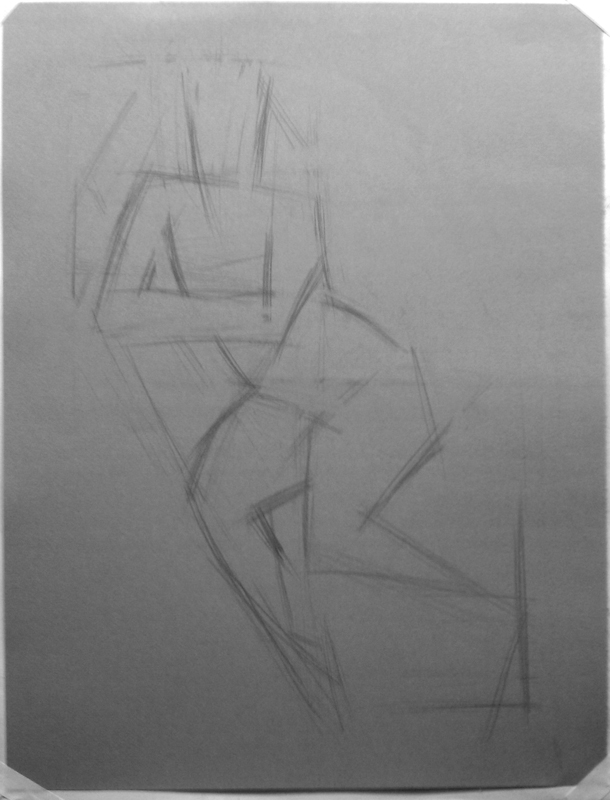
I found during the process that I had initially over-estimated the width of the pose. I had a choice: I could increase the height, or decrease the width to bring the figure into proportion. I decided, based on the placement on the page, to make the figure smaller not larger, and so I brought both sides in. I was sure to bring both side in equally, so the horizontal mid-point was not disturbed.

If I’d needed to bring one side in more than the other, I would have re-measured the midpoint.

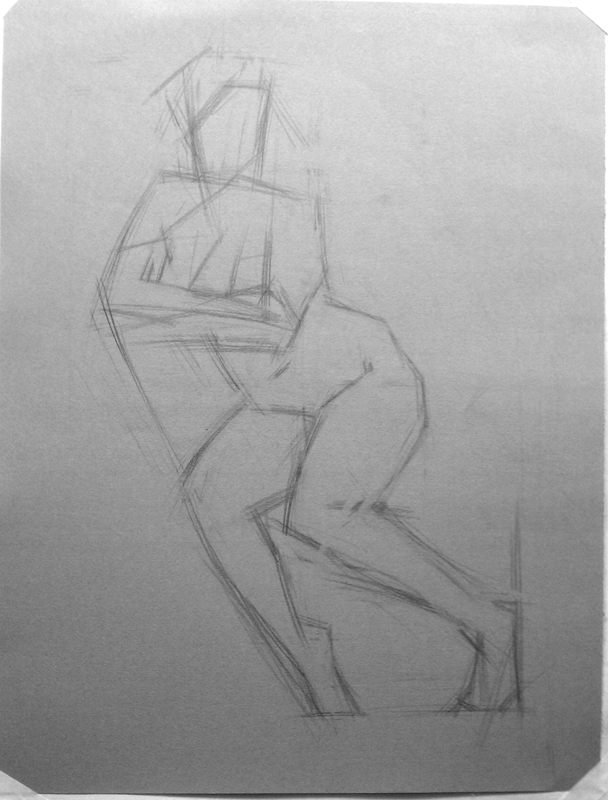
Once the major proportions started working, I could move forward and start refining the contour.

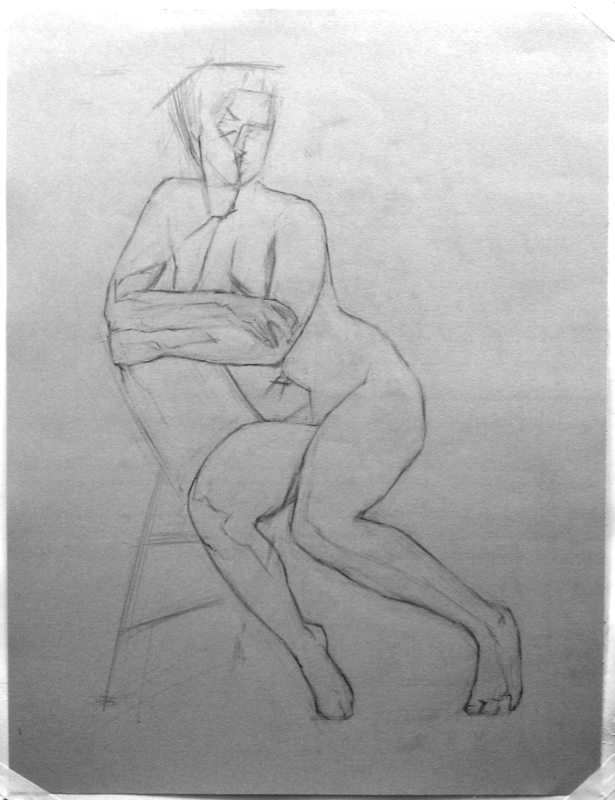
Refining the contours requires keeping in mind the principles of oragnic form, so avoid superimposing symbolic and generalized shapes of the optical realisty. I am always looking for tapering spiral wedges of form. Nothing is parallel.

Finally I was ready to start some shading, at least blocking in the shadow side of the figure. Blocking in the true shadow - the form not hit by direct rays of light from the primary lightsource - is a good way to clarify light from shadow, and keep all future value decisions in context. Everything in the light will be high value, everything in shadow will be low value, and the two will not be confused.

This stage makes the figure look very graphical and flat, and next week I start modeling I will be “turning the form” by shading from shadow up to light, which will make the form round again.

NEW CLASS: 
Due to high demand I am now offering an additional Figure Drawing Class this fall:

6 Saturdays 12pm-4pm 
September 17, 24
October 1, 8, 15, 22

Sign up for Figure Drawing Fall 2011 here

Wednesday
Apr272011

Study of Wendell

Study of Wendell, 18”x24”, charcoal, graphite, and white chalk on gray paperWe have just finished a 4-week, 20-hour pose by the amazing Wendell Wilson who was an excellent, rock-steady model for us.

This pose was for the Monday non-instructed Model Session. The sessions will pause for the summer starting in late June, but will be starting back up in September, please join us!

Also, we just had ONE spot become available in my Drawing Fundamentals class, 6 Sundays beginning May 15. The spots tend to fill quickly and I won’t be offering this class again until 2012, so sign up now:

Drawing Fundamentals class details and registration info are here

Tuesday
Apr052011

Back Study of Eric

Back Study of Eric
14 x 17 inches, graphite on paper
This drawing was done over 4 sessions with the model, about 20 hours. It was a great opportunity to study the forms of the upper back.

OPEN STUDIO

My studio will be open to the public for Mission Open Studios, April 16th and 17th.
Since I teach a painting class on Saturday, my open hours will be limited to:

Saturday April 16th, 4pm-6pm
Sunday April 17th, 11am-6pm

Please enter around the corner at 2111 Mission St, where there will be a doorman to open the building for you. Once inside there will be a map to all the open studios in the building.

Download a map of all the Mission open studios
My studio is part of the “Blue Studios” marked on the map at 16th and Mission.


Tuesday
Apr052011

Oil Sketch of Mary

Oil Sketch of Mary (unfinished)
14 x 17 inches, oil on mylar drafting film

Mylar is a new material I tried out as as support for an oil sketch (I use a brand called Dura-lar). Mylar is a frosted drafting film and I’d read online that it is an excellent material for oil sketches. The surface is smooth but toothy, and grips the paint well. The film is archival (it’s essentially plastic), and creates a stable bond with oil paint.

I started with a drawing on paper, which took the first 4 of 8 sessions with the model. The block-in is below, you can see the full drawing in an earlier post here.

Block-in of Mary
14 x 17 inches, graphite pencil on paper
When I was ready to begin my oil sketch, instead of tracing the contours and transferring the drawing to a painting panel, I simply laid the mylar directly over the drawing and painted on the translucent film, with the drawing visible but protected underneath.

the painting was done at night under artificial light. I don’t enjoy painting in color under artificial light, so I planned this as a monochrome sketch. I used Ultramarine Blue, Burnt Umber, and Zinc white to mix puddles of value. I mixed two “strings” (rows of paint puddles) on my palette each session, one string of cool grays and one string of warm grays. This way I could control the temperature of the values, even though I was not using color.

I really enjoyed working on the Mylar surface, it allowed for a lot of control of the paint and offered a surprisingly agreeable drag - not as slick as you might expect. It was perfect material for a sketch, but I would not do a finished painting on it.

Next time I would use drying agent in my medium, as unlike a chalk-gesso panel it’s completely non-absorbent so it took nearly a full week for each paint layer to dry.

————————

There is still one more spot in my upcoming 1-day workshop:
One-Day Intensive: Blocking in the Figure
Saturday, May 21 

Sunday
Mar132011

Recent Figure Drawings: Mary and Bilge

Study of Mary
14 x 17 inches, graphite on paper 
12 hour pose

Now that I offer 3 open figure sessions at my studio every week, I myself am doing figure study 12 hours per week!

The above pose we have decided to continue for a couple more weeks, and I am trying an experiment: painting a monochrome oil study of the pose in oil paint on mylar, which is a frosted sheet of plastic film designed for drafting.I usually use it for preparatory countour drawings for my oil paintings.

I use Dura-Lar Matte 2-sided film (be careful not to accidently buy the clear acetate in similar packaging, an expensive mistake!)

The film has nice tooth, creates a good bond with the oil paint, and is an affordable, portable material for oil sketches. Also, it’s translucent, so instead of transferring the contours of my drawing to a canvas or panel, I simply tape the mylar over my drawing and paint right over the pencil study I can see through it. So far I really like the feel of the paint handling on the film, and I plan to use it the next time I work outside. I’ll post photos of the finished painting study in a couple more weeks.


Study of Bilge
14 x 17 inches, graphite on paper
12 hour pose 

Sunday
Mar132011

Class: Block-In Intensive

Recently I organized a full day of model auditions for my studio, where 8 models each posed for one, 20-minute session. It turned out to be a really fun, energizing day of capturing 20-minute block-ins.

I was inspired by the auditions to create a single-day intensive class on the theme: We will spend one day honing our skills for capturing accurate proportion and gesture.

The class will be one, 6-hour weekend day, I have scheduled one in April and one in May.

More info and registration information is here

I hope you can join us!


Wednesday
Mar022011

Drawing: Study of Ward

Study of Ward
graphite pencil on paper, approx 14x17 inches

This study was done over 4 Monday figure sessions, 5 hours each. 

This upcoming Monday, March 7, we will be starting a new pose with a new model.

I offer long pose figure drawing sessions at my studio on Monday afternoons, and Tuesday and Thursday evenings.

On Thursday evenings I also offer a 1-hour demonstration before the group drawing session begins. These weekly demos are like mini classes, without the expense of commitment of a full class.

This Thursday, March 3, I’ll be demonstrating how to create believable 3 dimensional form in your drawings. I’ll also share tips for how to have very precise graphite pencil control for creating a strong sense of light on your subject.

I hope you can join us! More information here:

http://www.sadievaleri.com/model-sessions/

Sunday
Feb132011

Mary and Ward Drawings: Block-in

Study of Mary, Thursday evenings
16 x 20, graphite on paper, work in progress


Study of Ward, Monday afternoons
16 x 20, graphite on paper, work in progress


I am now offering two new long pose figure drawing sessions per week at my studio: In addition to the original Tuesday evening sessions 6:30-9:30pm, there are now sessions on Thursday evenings, 6:30-9:30pm, and Monday afternoons, 11:30am-4:30pm.

Before the Thursday and Monday sessions, I am also offering a public drawing demonstration and lecture, where I discuss how I approach academic figure drawing and painting.

These two drawings were from the first sessions and lectures, where I demonstrated how to find accurate proportions using the straight-line block-in technique. When we can judge the angles and distances accurately, we don’t need to rely on measuring or other tools to capture accurate proportions.

Next week, I’ll be demonstrating how to infuse figure drawings with energy, structure, and life, by understanding the 4 essential principles of organic form: Tapering, Interlocking, Spiralling, and Convexities.

Attending the lecture demonstrations is an excellent way to get a preview of my studio and my teaching technique.

For more information and to sign up for figure drawing sessions and demonstrations, please visit my Model Sessions page.

Friday
Oct292010

Tuesday Model Session: Study of Bilge, Session 4

Figure Study: Bilge Standing
Red/brown pencil and white chalk on buff toned paper

18 x 24 inches

Our lovely model Bilge gave us a standing pose to study for 4 sessions, and we greatly appreciate her for it! 

An update on the current painting and drawing classes I am offering - classes are filling very quickly so please email me ASAP if you want to be on the list for a future class:

10-Day Drawing and Painting Workshop
Jan 17-28, 2011
ONE spot left

Figure Drawing
6 Sundays beginning January 16, 2011
ONE spot left

Oil Painting I (Beginners)
6 Sundays beginning March 27, 2011

Oil Painting II  (Advanced)
6 Saturdays beginning March 26, 2011

Only 3 spots left

For more information about these classes and to register, please visit my Classes page

Also, I have updated my gallery page on my website so it is easier to see currently available paintings

Thursday
Sep302010

Tuesday Model Session: Study of Bilge, Session 1


This is the first 3-hour session of my drawing of Bilge. The lower drawing is my initial block-in stage, and the top drawing is the more refined stage of the same drawing. This will be a 4-session drawing. The original is about 18x24 inches.

Thursday
Sep302010

Tuesday Model Session: Study of Terry


This is the final drawing and also the earlier block-in stage of my 4-session drawing of Terry. The drawing is done in General's charcoal pencil and General's "white charcoal" on toned paper. The original is about 16 x 20 inches.

Wednesday
Sep012010

"Black Jug" Session 2 & 3: Drawing & Transfer to Panel


8 x 10 inches
graphite on gessoed panel
work in progress


I completed my drawing on trace paper/mylar. I ended up drawing the spiney seashell on another piece of trace overlaying the drawing of the pot. Then I scribbled with a soft 4B pencil on the back of the paper, and transferred the drawing to panel by tracing over it with a hard pencil. I spent a lot of time lining up everything so the horizon line of the shelf is straight and the vertical access of the jug is truly plumb. Any error in this image is due to photo warping.

Friday
Aug272010

"Black Jug" Session 1: Drawing

Study for "Black Jug" - work in progress
8 x 10 inches, graphite on mylar

The drawing for this painting is not complete, there is a second object in this composition I have not even begun to draw. But I wanted to post this because it's a good example of how I construct a symmetrical object. You can see I have drawn a center line, and how I have measured each significant point on the contour so I can plot each side symmetrically.

As I am working I often stand back to judge the progress of the drawing by asking myself 2 questions to check my proportions:

  • Is my drawing wider or taller than my subject?
  • Does my drawing have the same feeling and character as my subject?
I try to be as scrupulously honest as possible with my answers. I try to remain willing to change anything and everything to capture my subject more accurately. I never let "good enough" be a satisfactory answer. This is how I try to approach all my drawing and painting.

I found this gorgeous black jug in an antique/collectibles shop recently, and of course it reminded me instantly of a very famous painter of still lifes. So I will make no attempt to hide the fact that this piece is an homage to an artists who has inspired me a lot. Even though our approach and methods for painting are just about as far apart as is possible, the sense of calm, light, solidity, familiarity, and reverence he shows in his work has been a big influence on me.

I am also attempting something I rarely do, and that is to start two paintings at the same time - this one and the previous post, "Message in a Bottle". When I have tried this before, one painting gets neglected and languishes while I finish the other. I'm going to try to keep these going at the same pace and complete them at the same time. And I'll be documenting the whole process, so stay tuned.

--------------------------------------------------------------------

FIGURE DRAWING CLASS
I still have two more spots in my upcoming figure drawing class starting September 12.

Learn 19th century atelier methods for depicting accurate proportions, convincing light, and organic form through the careful study of a long pose.

6 Sundays, $480

Click here for more information and to register.

Friday
Aug272010

"Message in a Bottle" Session 1: Drawing


"Message in a Bottle" - work in progress
8 x 10 inches, graphite on mylar

It's always hard to start a new painting, and my FaceBook friends saw a few status updates from me this week about how hard it is to set up a still life. But I'm always relieved and excited when a still life finally comes together, even though it is rarely the vision I had when I started moving objects around on the shelf.

I still have a lot of antique scraps of paper from an era when I did a lot of collage, and a little piece of envelope, slightly yellowed, with a foreign stamp and a "por avion" printed on it seemed a perfect fit with the uniquely proportioned glass bottle. Another glass bottle wrapped in cream-colored tissue paper (not wax paper this time!) and a buttery-transparent little shell made friends, creating a harmony of creams.

In my last still life "The Wave" I really liked how the blue-white of the wax paper highlights made the shelf edge look slightly yellow in contrast. In this arrangement the cream colored papers and seashell make the shelf seem more white.

I think all my paintings are simply studies of all the different subtle hue variations within whites and grays.

Tuesday
Aug172010

Long Pose, Day 1 - "Danae"

"Danae"
pencil on panel
12 x 16 inches
Today was the first of a 5-day pose I have arranged in my studio this week. We have 5 artists participating (including me) and we work each day from 10am-5pm. For artists this is the ultimate working-stay-cation! Today we spent the first hour or so setting up a pose we all liked from many angles (no small feat!), and then chose our spots by lottery (I drew a #5, dead last, but I like my spot). The we all mounted our paper and got to work.

I'm attempting to do a very fast (fast for me!) painting of the our model Danae this week, so today I blocked in this line drawing on mylar paper and then during a model break I transferred the drawing to my 16x20 hand-primed panel. I spent the last part of the day refining the pencil drawing directly on the panel. Then I erased the extra graphite, brushed down the surface with a wide, flat brush to get rid of eraser crumbs, and coated it with thinned Damar varnish (thinned with about 1/5th mineral spirits) to preserve the drawing and seal the porous surface.

Tomorrow I start painting - record speed for me!

ALSO:


Live Webcast Studio Tour and Demo
Saturday August 21
9am -11am Pacific Standard Time
12noon- 2pm Eastern Standard Time
$10 - Click here to sign up

I'll be giving a video tour of my studio, a behind-the-scenes look at my latest Wax Paper painting "The Wave", and also doing a drawing demo. You can even submit your own questions, in advance or in real time.

Hope to see you there!

Thursday
Aug122010

Figure Drawing, Back Study


Back Study
14 x 16 inches
Graphite pencil, charcoal and chalk on toned paper

I did this drawing over two sessions at the Tuesday evening figure model sessions I host at my San Francisco Mission District studio. My recent Anatomy/Ecorche studies came into play as I tried to identify all the anatomical landmarks revealed by the raking light across her back.

I still have a few spaces left in my upcoming Figure Drawing Class, 6 Sundays starting September 12. For more details and to register visit my Teaching Page.

http://www.sadievaleri.com/teaching.html

Thursday
Jun102010

Tuesday Model Session: Study of Melissa


Study of Melissa
16 x 20, graphite on paper


Tuesday evenings I open my studio to long pose model sessions. I did this drawing of one long pose over 4 sessions.

The open model sessions are $80 for a series of 4 consecutive Tuesdays, $22 if you'd like to drop in and try one session before committing to a series of 4. The next series begins next Tuesday, June 15th. For more information and to sign up for upcoming sessions, visit my Class Schedule.


Friday
May212010

Winged Victory Drawing Demo Recap


"Victory in Chalk"

Charcoal and white chalk on toned Ingres paper
16 x 20 inches

This is the sketch I did for my drawing demo at my San Francisco studio earlier this month. The evening was so much fun - I was very nervous the days leading up to it, and I wondered why I had planned such a high-stress event for myself right in the middle of my teaching semester... but once I got started talking and drawing it was a breeze!

We had about 28 guests in my studio, lots of snacks and wine, and during the breaks there was lots of mingling and a warm buzz of conversation.

I gave my condensed lecture on "Observing The Nature of Organic Form: Tapered, Spiraling, Interlocking, and Convex", which is my humble abbreviation of the amazing principles I learned from my master teacher Ted Seth Jacobs and also from his students Tim Stotz and Michelle Tully.

Thanks to everyone who came out, and extra special thanks to my mom, dad, sister and  husband who all helped me set up the studio and greet guests - I am so lucky to have a supportive family!

To be notified when I host a drawing demo again join my email list, or follow me on Facebook!

Tuesday
May182010

Odalisque Drawing


Mary as Odalisque
16 x 20 inches, charcoal and chalk on Ingres toned paper

I realized all the figure drawing I have done in the last year has been as demonstrations for my students, so it's been wonderful to get back to figure drawing just for myself! This was done at my weekly Tuesday evening model session at my studio. We have a great little group started, and there is still room for a couple more, hope you can join us! (see my teaching page for more info)

I am also offering these upcoming workshops:

early bird special: $600

early bird special: $600