Studio Escalier Workshop Day 8
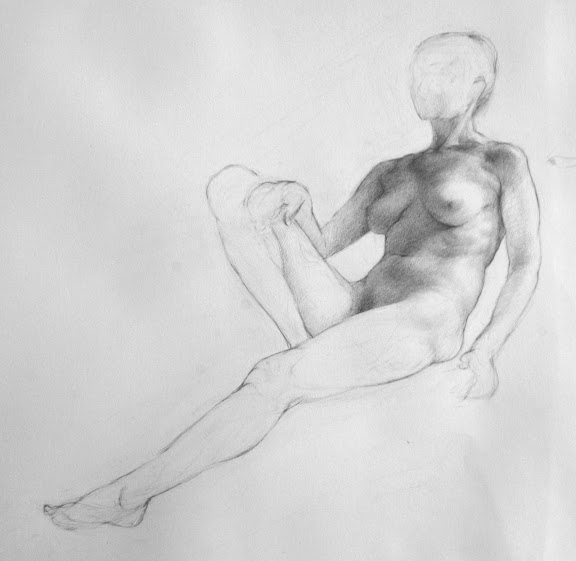 tonal study, pencil on paper, 6 hours
 (detail of above)
Day 8 of my workshop at Studio Escalier in Paris.
This is a drawing of a 6-hour pose. Yesterday for the first half I focused on the inner movement curves, the block-in, and finally the detailed contour. Tim and Michelle are teaching us to think of the contour three-dimensionally. So I am thinking of the contour wrapping around the body, moving towards and away from me.
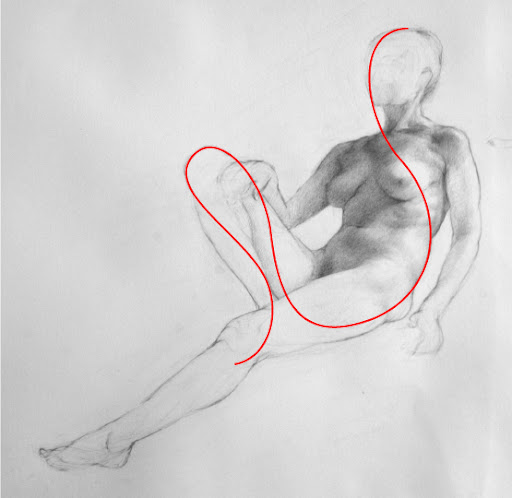
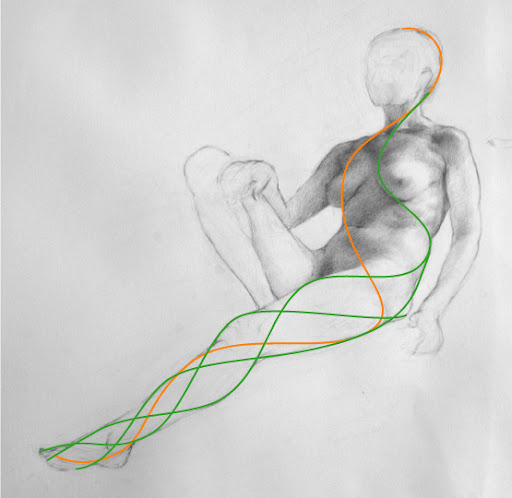
I've taken my drawing into Adobe Illustrator and used the software to recreated my original inner movement curves to diagram the process I am learning:
 As Tim teaches the technique, we draw three interrelated movements:
We start with the theme, which is the fundamental inner movement curve. The theme starts at the crown of the head, and flows down the center line of the face, down to the big toe of the standing leg, or the leg holding the most weight.
This is a precise curve, it describes specific points on the body and the relationships between these points. (In contrast to simply "expressing" the movement. This is a record of what we see and know about the body, it's not exaggeration or expressionism.)
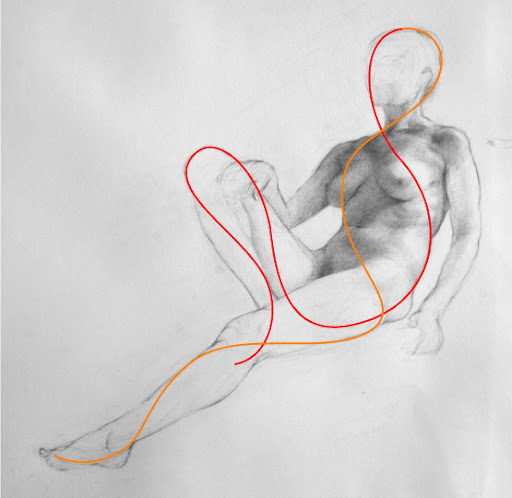 The second line we draw (above) is the countertheme - the orange line. It's a secondary inner movement curve that travels from the top of the head, wrapping around the body the opposite direction and down the non-standing leg.
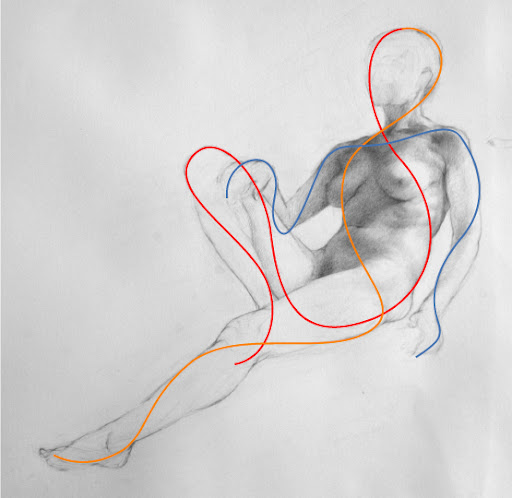
Third, we draw the ornament (above). This is the third interrelated movement. As with the theme and countertheme, the ornament wraps around the forms, moving side to side and back to front.
 All of the curves wrap around the body three dimensionally. Above is the same countertheme curve, but I've created dotted segments to show where I am imagining it wrapping around the back side of the form. (I do not modify the figure to fit these curves, it's amazing the interrelations it's possible to see once you start looking this way.)
 Above I've shown how adding more and more interrelated movement curves begins to describe the form. As I get more and more detailed with my contour line, I can see how every form on the body follows this wrapping helix pattern.
It's interesting to recreate the curves in Adobe Illustrator. The program creates Bezier curves that have a certain mathematical tensile force, and you have to learn to manipulate them to create flowing curves without awkward bends. The behavior of of Bezier curves is amazingly conducive to the Inner Movement Curves - it was shockingly easy to recreate the curves with the software. I have a feeling there is an implicit relationship between the cohesive, efficient, and functional forms of the body and mathematical curves.
Update added 5/03/08
Bezier was a 20th century French draftsman! Wikipedia has a great entry on Bezier curves, and near the bottom of the page you can see elegant animations for how Bezier curves are calculated.
After spending so much time on the contour, I moved on to the tonal value shading. I was surprised how quickly the value study progressed. I think learning the contour with this method gives me a deep understanding of the three dimensional figure, so flowing the light across the form is easier.
I'll end with a quote from Tim:
I agree.
 View Printer Friendly Version
Reader Comments (5)
This is soooo facsinating. It makes me think of a variable time line. As the curves get closer to the contour it slows down and where it travels along the highlighted areas it moves faster.
Time... this is interesting.
If a car travels at 60 mph toward the horizon as it got closer to the horizon it would appear to exponentially slow down. If a car traveled along the horizon at 60 mph it's rate of movement would not vary at all.
It must be true that if a trajectory of a line travels around say a sphere it would appear to speed up and slow down if we remained staitionary as it traveled even though it's speed was constant.
These lines are a record of the elegance of time and the illusion of it's speed varying.
It is beautiful.
Thank you for the inspiration.
I too find it fascinating all the ways that art and physics and human perception intersect. It's a pretty awe-inspiring universe that manifested beings like us that are able to witness it.
Hi Sadie. I follow your blog for more than a year, aprox. I allways found it fascinanting and VERY instructive. Here in Argentina the realistic approach is not very developed and is thanks to you and other artist that put is knowledge in internet that we can make some progress!
From time to time, I go back and re-read some of your technical post.
I've a quetion regarding this method of the inner curves. Perhaps I'm over familiarizated with the blockin and this method sounds me hard to grasp.
How this method proceed? The inner line, you do it without measuring? You mark some key points? At the present day, you use the blockin or the inner curve approach?
Well, it's all.
Sorry for my english!
Thanks a lot, and again, this is one of my most visited blogs!
Best!
Hi Ariel - I use the block-in and the movement curve together, switching back and forth and using each method to compensate for the weaknesses of the other:
Block-in tends to make things too rigid and also small innaccuracies make the figure feel lifeless. But the movement curve can make a figure look unstructured and too "flowey". Together they make a strong armature, and each can be cross-referenced and corrected with the other method.
I don't mark points, I draw the curves I see wrapping around the form with one long fluid line, and I notice the points where the curve comes in contact with the visible contour on the edge of the form.
Hope that helps! Thanks for following and for your kind words!! :)
-Sadie
Thanks Sadie, perfectly clear now! Additionaly, I saw your pdf and understand how do you proceed (first large blockin, then inner courves, etc).
Now, I suppouse is a matter of practice!
Thanks a lot!