Silver Globe Pitcher: Overpainting Stage 2
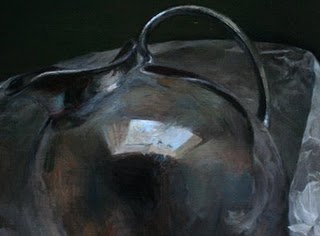 Detail of work in progress
 Detail of work in progress, previous stage
I've also been struggling with the swatch of wax paper that runs behind the pitcher. The crinkles up in the right corner catch the light and jumps out quite a bit, but if I paint them with too much contrast they look a) too eye-catching and b) dumb. It's been a lot of push and pull to get it to this stage.
For some reason the bottom pedestal of the pitcher I worked on last week was a breeze in comparison to these areas, even with all that semi-transparent wax paper overlapping the pedestal.
All these photographs are reducing the color saturation compared to the actual painting. My paintings are of course very monochromatic, but I use a full range of hues to mix my neutral colors, and in person you can see a lot more range of hues within the values. For the final photo I'll work harder to get a very accurate photo.
Mediums:
I still like working with the tubed Maroger quite a lot, but it has a tendency to dry fairly matte in the dark areas. So I'm going back to the linseed-based medium for the darks, especially the background. I'm sticking with the Maroger for the light areas.
 View Printer Friendly Version
Reader Comments (3)
I'm curious about something - how much attention do you pay to warm/cool shifts? I've been generally going with "warm light, cool shadow, warm reflected light" or vice versa. But I notice when I do grisaille studies that lighter areas always look cooler because as soon as I add white, it cools everything. How do you deal with warm/cool when you paint monochrome? E.g. the earlier pitcher state is a lot warmer than the later, is that something you are tracking?
The warm/cool philosophy never resonated with me, although many people teach it and swear by it.
I think it is an impressionism/post impressionism concept - brought about by observing natural landscapes in daylight.
Dan Thompson makes the excellent point that we should learn to draw from the Renaissance masters, but that we should learn about color from the Impressionists, who were the true masters of color.
I don't know if it's my personal taste or my inability, but I see value before I see color. I'm more interested in value than color. If I think about "cool light/warm shadows" I get confused and my painting falls apart. I just paint what I see, which is light and dark with tints of color.
I've decided to go with my inclinations, at least for now. Maybe later in life I'll become a true colorist :)
My underpainting is warm just because I use brown paint and turp. I could use black, but I feel that would leach color out of later layers of paint. I don't think of the brown underpainting as warm, I just think of it as value that happens to be warm. I don't start thinking about color at all until I switch to the overpainting stage.
I'm not saying this is the way to paint, it's just the way I paint :)