Varnish: Updated Method
 Thursday, July 3, 2014 at 1:45PM
I wrote about varnishing a while back in this post. Since then I have refined my methods and materials a bit so I decided to write an update (I’ve copied the relevant parts from the old post so you don’t have to go back and compare posts).
What is Varnish?
Varnish is the final clear finishing coat applied over a “dry” oil painting. Varnishing seals the surface of the painting, protecting it from dust and dirt build-up. It also restores an all-over sheen to the whole painting, deepening shadows and restoring colors that may have gone matte as the paint dried.
How “Dry” is Dry?
Traditionally, artists waited 6 months to a year before varnishing. And that’s for thin paint! Thick globs of oil paint may actually take many years to dry completely. However, if you are actively showing or selling your work, or working on commission, it is highly impractical to nearly impossible to wait that long to varnish. So, many artists varnish when the painting is “dry to the touch”. There is danger of cracking however, especially if the paint is thick and you are working on flexible canvas. I work with thin paint on wood panel, so I’m not so worried about cracking.
What Kind of Varnish?
Damar is the traditional varnish used by artists, made from tree resin. However, it is known to yellow with age, and it is also very brittle. Gamblin, manufacturer of paints and mediums, has a good varnish called GamVar but for smooth, very dark paintings I have found it is too shiny, and over-emphasizes brushstrokes. Many artists want their brush strokes emphasized, but I prefer a smooth surface, especially in a dark background.
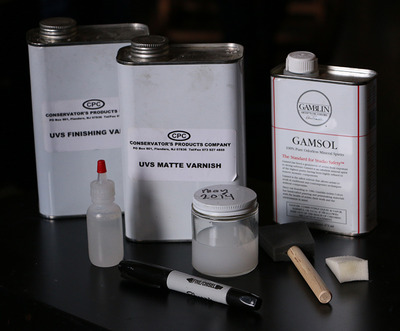
So now I use a varnish called Conservator’s Products UVS Finishing Varnish. It comes in a Regular (glossy) and Matte version, and I mix the two to get a satin finish. It has a slightly greater surface tension, so it seems to self-level and even out the surface.
Mix Up Your Varnish
To mix the proportions, I mark the side of a jar with a sharpie. I like 50/50 matte/glossy varnish, and I like to cut the whole thing with 50% turpentine, so I mark 4 equally-spaced marks on the side of the glass.
Shake the cans of varnish before you take the caps off, to make sure it’s mixed well in the can.
Fill your jar to the first mark with Matte varnish; then fill to the second mark with Glossy varnish; and then fill to the top mark with turpentine or mineral spirits (ignore the 3rd mark, it’s just there to help you get the spacing correct). I use odorless mineral spirits, but I just learned recently that you should use real turpentine for proper mixing, so I’ll be using real turp in the future.
You can use measuring spoons or shot glasses to mix up your varnish, but I find this makes more of a mess and gives you more vessels to clean afterward, so I like the pour-to-the-mark measuring method.
Finally, write the month and year on the lid with the sharpie. Varnish is not very stable, and occasionally I have applied “old” varnish and it simply won’t dry - stays tacky for days. So I mix up a fresh batch every couple months. The date on the lid tells me how old the mixture is.
Why Add Turp?
The reason I like 50/50 turp in my varnish is to make it the equivalent of “retouch varnish”. I feel this is easier to apply, makes a better surface, dries in a minute instead of 3 seconds so you have time to brush it a bit, and it is thin, so if I mess up I just add a second coat.
Add the STABLIZER
The varnish comes with very important STABLIZING drops, they recommend 5 drops per ounce. This is what makes the varnish dry, otherwise it stays wet, so remember to add the drops (personal experience speaking)! If you run out of drops or it dries out because you left the cap off, they will send you another little bottle for free. (Yep I did that, too).
When you are done mixing the varnish screw the cap on and shake the jar well to mix it
You will need:
- Varnish - Matte and Shiny versions
- Sponge brush (Buy several, they are cheap)
- Makeup sponge wedges (you can get them in drugstores near the makeup)
- Windex
- Small shallow dish (larger for a large painting)
- Small soft paintbrush, like a #1 sable filbert
- Low-lint cloth
(There is no such thing as “lint-free” but do the best you can. I use floursack-style dishcloths, although I recently discovered soft auto-cloths, almost like baby diapers, which I am going to try next.)
Lint is Your Enemy
Lint (and dust) will conspire to flock to your painting in massive unforeseen hoards. The largest airborne bits of debris you have ever seen will suddenly appear to hover above your freshly varnished painting in a great, slow mating dance. Your job is to keep lint off your painting, and off everything else that might come in contact with your painting.
Reduce Stress
Never varnish the same day you ship, frame, or deliver a painting! Give yourself a few days of extra time, both for the sake of the painting, and for your own sanity.
Windex
Squirt a makeup wedge with Windex and give the whole painting a quick wipe-down. The Windex will evaporate in a minute or two. This cleans dust and fingerprints off the surface of the painting, and the mild ammonia solution of Windex “bites” into the surface a little, so the varnish layer will adhere correctly.
Please note: Applying Windex to your painting is controversial, and some say you shouldn’t do it. I’ve made the choice to use it, because I have not been convinced it does any harm, and it is SO good at solving many problems I have with wet layers (oil paint OR varnish) adhereing to dry paint layers. I use it between every layer of my Indirect paintings, to help the layers adhere. Use at your own risk.
Dry Thoroughly
Next, set your painting on an easel and shine a lamp on the painting for a couple minutes (don’t lie the painting down flat or it will just accumulate more dust). This will evaporate any moisture or windex left on the surface. If there is moisture on the surface, the varnish will “bloom” - a horrifying phenomenon, where you may think you have achieved a perfect varnish finish, only to find that within a few hours that the surface has developed a opaque white haze. Don’t let the painting get too hot, but it should warm a bit under the lamp.
Ready, Set…. VARNISH

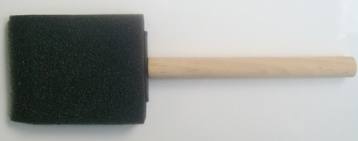
When you ready to apply the varnish, use SPONGE brushes. They are cheap, they don’t leave any stray hairs behind, and best of all you can just throw them away when you are done. I keep a batch of fresh my new ones in a plastic ziplock bag, so they don’t gather dust before use.
Pour a very small amount of varnish into a clean, lint-free dish. It’s easier to dip the brush in a shallow dish, and also you won’t be contaminating your nice clean varnish jar with the inevitable dust or debris on your brush.
Dip the tip of the sponge brush in the varnish, and then brush on a thin coat over the painting, using long, horizontal strokes to cover the entire surface.
If there are bubbles or streaks, sometimes I go over the whole surface again with a makeup wedge dipped it varnish, just to get a smooth surface. But work pretty fast, it starts to set up within a minute.
Waiter, There’s a Fly in my Soup!
What to do when you get lint in your varnish: Use the small #1 filbert to carefully “back brush” and lift the lint out with one swift flick, and wipe on low-lint cloth. If you don’t dig around too much, the varnish should “heal” and there should be no sign you messed with it.
The Inevitable Do-Over
At some point everyone has to re-do a varnish job. If you have lots of lint, or bloom, or if the surface was touched or damaged, you’ll have to remove the varnish. To remove, dip your clean lint-free cloth in odorless mineral spirits, and gently wipe (or even roll) the cloth on your painting. Be careful not to damage the painting, but keep in mind, it’s probably more resilient than you think. Dry paint film is pretty strong. Wipe until it seems like all the varnish is gone. If you are not sure, wait a few minutes for the OMS to evaporate, and then look for glossy areas. Start all over again, starting with removing any dust or lint.
Varnishing a Smooth Painting
My paintings have a pretty smooth surface, which adds another issue to varnishing: Beading up. Sometimes the varnish immediately beads up just like water on a new car. This is because the surface is so smooth that the varnish has nothing to “grab”. The Windex takes care of this problem completely!
Removing Dry Varnish
Varnish is made to be removable by anyone in the future cleaning or restoring your painting. It is designed to dissolve easily with odorless mineral spirits (OMS). It’s hard to imagine rubbing OMS or turps on your oil painting, but keep in mind, dry oil paint has a very strong film and won’t simply wipe away with gentle swipes of OMS. So the good news is, if you mess up your varnish, it’s easy to remove and re-apply.
Varnishing is tricky, and it’s always a good idea to practice on a small painting you don’t care much about before varnishing your masterpiece.
Reader Comments (7)
http://blog.mitchalbala.com/gamvar-an-easy-to-use-varnishing-solution-for-oil-painters/
Thanks so much for writing this article. I remember the windex controversy but I'm willing to take that risk! :)
Julia
I recently learned that it's a good idea to apply the shiny coat first, let it dry, and then apply the matte coat.
"Finishing Varnish" is shiny and "Matte Finishing Varnish" is matte.
They don't call the shiny one shiny, or "regular", so there was no way for me to designate it as the "not matte' version.
You also might want to try the Gamvar version. You can mix the Gamblin Cold Wax by heating it a tiny bit in the microwave, and adding 10-20% to the Ganvar. Probably less expensive, but I have not tried it.
In any event, come by the new studio, I'd love to show you the new space!!
-Sadie